First Look: Fujifilm XQ1
First Look: Fujifilm XQ1
Talk to Rico (open forum for questions & feedback) – Rico’s Flickr sets – XQ1 Sample Images Set – Expanded X-E2 Sample Images Set – Mastering the Fujifilm X-Pro1 reading samples (65 free pages) – Order my NEW book (print or DRM-free eBook/PDF): Mastering the Fujifilm X-E1 and X-Pro1 (use code FUJISAVES30 to save 30%!)
Size does matter: Succeeding the stylish Fujifilm XF1 point&shoot camera, the full-metal XQ1 is even smaller and more lightweight than its already very pocketable predecessor. Solidly built, the XQ1 comes in either black or silver, and it features the same 2/3″ X-Trans sensor as in Fuji’s bulkier and more retro-styled X20 compact camera.
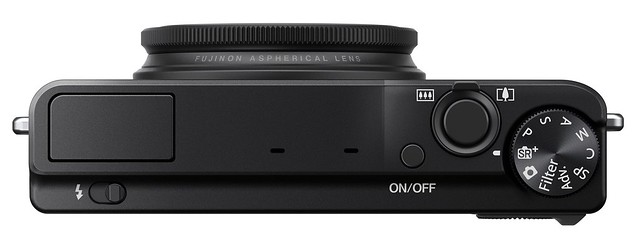
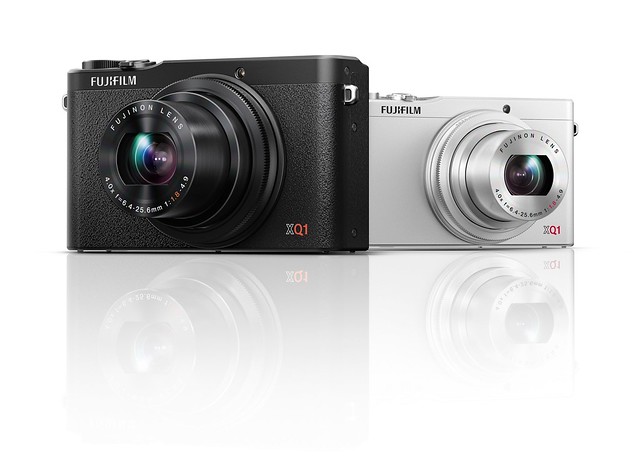
Exterior
Since many customers took issue with the manual zoom mechanism of the XF1 (and its unconventional on/off switch), Fuji equipped the XQ1 with a more conventional electronic “fly-by-wire” zoom and a standard on/off button.
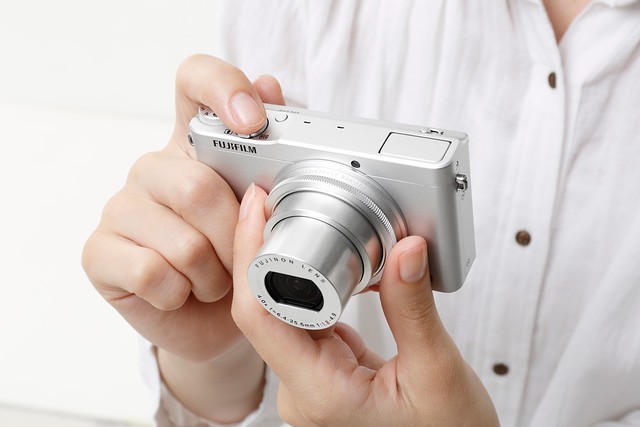
The manual zoom ring has been replaced with a multifunctional “lens control ring” that can serve many different purposes. One of them, of course, is zooming the lens, so those of you who actually like to zoom in and out the “old fashioned” way can do so by setting the lens control ring to serve as a zoom ring.
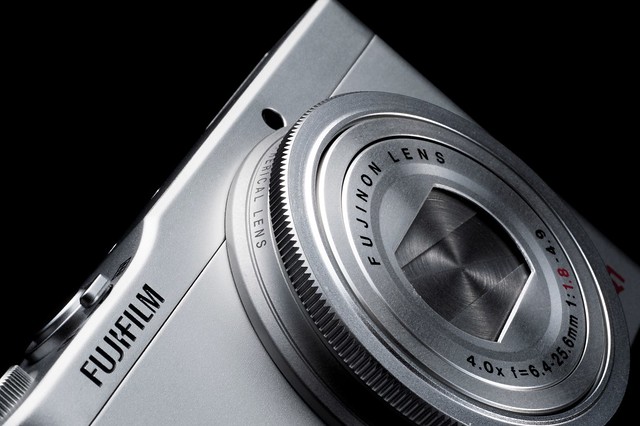
In its “smart” standard setting, the control ring will assume different functions depending on which mode the camera is operating in. For example, in P exposure mode, the control ring handles the exposure shift. In aperture priority mode, you can use it to set the aperture. If you want to manually set the control ring function, you have a choice of controlling either exposure, ISO, white balance, film simulations, drive mode or zooming. In its default “smart” setting, the control ring offers even more variety, like picking an effect when in the Advanced Filter mode, or choosing a scene mode when the camera is set to Scene Position (SP).
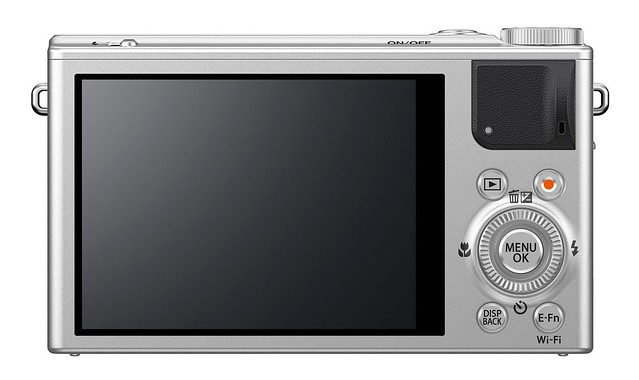
Like in the XF1, six of the nine buttons on the back of the XQ1 have a second function layer that can be user customized. This basically gives you six different function buttons that can control any of the following features: face detection, intelligent digital zoom, ISO, image size, image quality, dynamic range, film simulation, white balance, drive mode, photometry (exposure measurement mode), AF mode, focus mode, focus area or wifi. To access this second button layer, simply press the E-Fn button.
A notable change is the camera’s new NP-48 battery, which is smaller (but not less powerful) than the NP-50A batteries previously used in the X10, X20 and XF1. The battery can be charged inside the XQ1 with a simple USB connection. The camera comes with a power supply and USB cable, but you can just as well use any existing USB (aka smartphone) charger. You can also use the supplied cable to connect the camera to the USB port of your laptop, or any car/airplane charger with a USB outlet. So if you travel with your smartphone or laptop, chances are you can save weight and space because you don’t have to bring an extra charger or power supply specifically for your XQ1. Of course, those who prefer to charge their batteries outside the camera can always purchase an external Fujifilm or third-party charger.
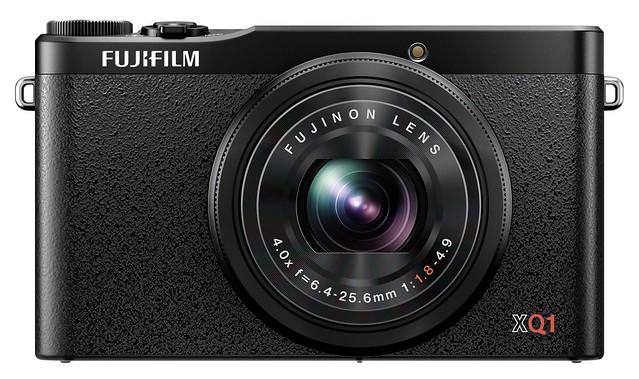
The lens in the XQ1 is the same 6.4-25.6mm lens as in the XF1, which is equivalent to 25-100mm on a 35mm format camera. The maximum aperture ranges between an impressive F1.8 at the wide end, and a much less impressive F4.9 at the telephoto end.
Features
As a stylish premium point&shoot camera, the XQ1 combines automated features such as Automatic Scene Recognition (SR+) and Scene Modes (SP) with more conventional and enthusiast-minded PASM exposure modes. Those who already know the X-A1, X-M1, X10, X20—and especially the XF1—will feel right at home. If you are not yet familiar with the basic features of the XQ1, you might want to visit Fuji’s official XQ1 product information page, which will give you an overview over the specs and features of this camera.
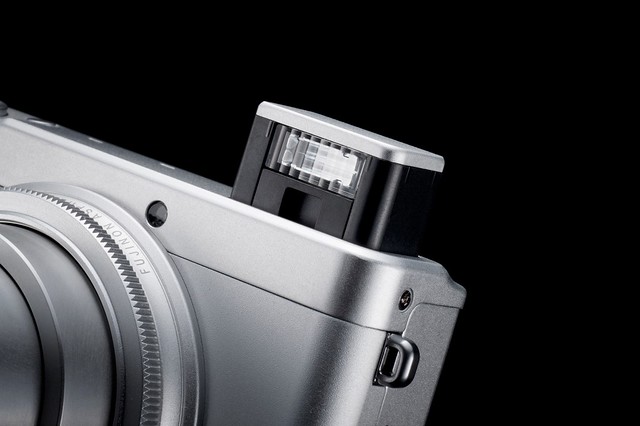
While there’s no hot shoe to connect external flash units, the XQ1 offers a tiny built-in “super-intelligent flash” (that’s how Fuji’s marketing calls it) that can serve as an effective fill-in light. Flash has always been one of Fujifilm’s strengths, and the XQ1 is no exception to this rule. Instead of flashing the subject “to death”, the camera’s TTL flash acts quite subtle. The results that are rather pleasing, like this snapshot:
Like all X-series cameras, the XQ1 features a built-in RAW converter, so if you want to change the exposure, highlight and shadow contrast, dynamic range, color grading, sharpness or noise reduction of an image after it has already been taken, you can do so with a few clicks in the menu as long as you did keep the RAW files of the shot. This, for example, is a “black&white with red filter” version of the above image:
Using the built-in RAW converter, you can also adjust the white balance of any RAW image after the fact. For example, you can easily change the rather warm auto white balance of this shot…
…to a cooler look by using either the Kelvin function or one of the available white balance presets:
Of course, you can also customize the white balance before taking a shot. This feature came in very handy in a Nuremberg modern art museum with large wall areas that were illuminated with light of various tints and color temperatures:
Like all Fuji X cameras, the XQ1 offers a very effective dynamic range expansion mode that can extend the highlight dynamic range of any shot by one (DR200%) or two stops (DR400%). In the recommended DR-Auto setting, the camera will either choose DR100% (no highlight DR expansion) or DR200% (1 EV highlight DR expansion).
So far, I haven’t been able to make the XQ1 automatically pick DR400%, which is in line with Fuji’s new and improved exposure model: The X-A1, X-M1 and X-E2 apparently also only choose either DR100% or DR200%. The following shot was taken with DR200%:
That’s not to say that DR400% should by entirely discounted. As a conscious user choice, DR400% can work miracles on scenes with very high contrast. The following example was taken in DR400% mode in concert with a +1 EV exposure compensation in order to lift both the shadows of the scene and save the highlights. The resulting dynamic range was even good enough to apply Velvia to the scene, the most contrasty and colorful of the XQ1’s three available color film simulations:
Many of you will expect the XQ1 to behave like a cross-breed between the X10 and the XF1. And while the button layout and user interface of the XF1 and XQ1 are very similar, the XQ1 is also very much a tiny version of Fuji’s new X-E2. It’s not only featuring the same fast processing engine, but also the same new hybrid tracking autofocus, a WYSIWYG manual exposure mode with a working live histogram, built-in wifi (currently used for file transfer and geotagging), ± 3 EV exposure compensation, ± 2 EV flash exposure compensation and (with Auto-DR and Auto-ISO switched on) an information display showing the camera-selected dynamic range and ISO settings when you half-press the shutter button.
Like the X-E2, X100S and X20, the XQ1 also features a so-called lens modulation optimizer (LMO) that reduces unwanted optical effects such as diffraction caused by a stopped-down aperture. There’s also a macro mode that allows you to get closer to your subjects:
The XQ1 can easily serve as a “bread and butter” point&shoot camera with all the usual mainstream features such as automated Scene Modes and effect filters. You can create 360 degree Motion Panoramas, or simulate a more shallow depth-of-field with the camera’s Pro Focus Mode. There’s even a multiple exposure mode to create a composite of two subsequently taken shots, and in poor light, the XQ1’s Pro Low-Light mode merges multiple high-ISO shots to one single image that shows little noise and artifacts:
All this is very nice, but it’s nothing to get overly excited about, since we’ve already experienced these features in previous Fujifilm compact cameras. We certainly wouldn’t expect the XQ1 to offer anything less, would we? So what are the unique things the XQ1 can do that no other Fuji X camera (with the exception of the new X-E2) has yet to offer?
Autofocus and Performance
The “groundbreaking” feature of the XQ1 is (at least for Fuji users) of course its improved autofocus system. On a hardware basis, the XQ1 (and X-E2) employ the same hybrid on-sensor PDAF/CDAF as their older X20 and X100S counterparts. This means that the central nine AF frames can be used not only with conventional contrast detection autofocus (CDAF), but also with the more DSLR-like phase detection autofocus (PDAF). The latter technology doesn’t “pump” back and forth while locking on a target, hence offering a faster and more direct method to quickly lock on a subject as long as the lighting is sufficient for the PDAF pixels on the sensor to serve their purpose. The camera automatically combines both AF methods, so there’s no need for the user to manually switch between modes.
Since this technology has already been in use in the X20 and X100S, the actual novelty is the improved AF firmware of the XQ1 (and X-E2). It allows the camera to track moving subjects with the hybrid autofocus system, keeping them in focus while they move towards or away from the photographer.
In order to test this feature, I put little Maria on a merry-go-round, set the camera to 1/250s in S mode, engaged AF-C and set the camera’s burst mode to the slowest speed of about 3 fps. As the carousel was spinning, I followed Maria’s face with the center AF field of the XQ1 while half-pressing the shutter button. Once she came in closer range, I fully depressed and held the shutter button to shoot a burst of images. Here are two of the results (one in landscape and one in portrait format), showing that I was able to get quite close:
It is important to note that tracking isn’t depending on the PDAF to work, it also works with the CDAF. Olympus users already know this feature from fast “CDAF only” cameras like the OM-D E-M5.
The new AF-C also works in concert with the camera’s face detection. In order to test this feature (and to make sure that the camera would be unable to use the central PDAF sensor area), I asked Alina to walk towards the camera, which I had set to AF-C, slow 3 fps burst and face detection. She walked from here…
…to here within a second or two:
Using the portrait format and keeping Alina’s face in the upper part of the frame, I made sure that the XQ1 could not use the central PDAF pixels on its sensor. Here are crops of the five images that were the result of this series:




How exactly does this new “burst AF” mode in the XQ1 and X-E2 work? Let’s have a look:
- In previous Fuji models, setting the camera to AF-C meant that it would always focus on a target in the center (crosshairs) of the frame before half-pressing the shutter button, and then lock focus (as well as exposure, white balance and DR settings) when the shutter button was half-pressed. Pressing the shutter button further down resulted in a burst of images that were all taken with exactly the same locked focus, exposure, white balance and DR settings.
- With the XQ1 and X-E2, the camera will normally not focus on a subject before you half-press the shutter button, but it will continuously do so after you half-press it. Fully depressing the shutter button leads to a burst (series) of images, but the camera will still refocus between the shots and also readjust the exposure. It will not readjust DR and white balance settings, though. Those settings are always kept from the first image of a series.
In slow burst mode, the XQ1 and X-E2 are basically using AF priority to create a series of shots of moving subjects that are all supposed to be in focus. Practically, this will only work for a certain percentage of your images. In my carousel examples, about 2/3s of my shots were keepers.
What happened to the “old AF-C”? It is now called “Pre-AF”, and it is still available as a menu option, both for AF-C and AF-S. If engaged, the camera will still try to focus on any subject it is pointed at, even when the shutter button is not touched. Pre-AF, AF-S (Single) and AF-C (Continuous) now work with all 49 of the XQ1’s (and X-E2’s) AF frames. Pre-AF and AF-S/AF-C also work in concert with face detection, so the camera can automatically pre-focus on any face that enters the image frame. While this option quickly drains the battery, it decreases the camera’s response time to actually lock the focus on a target.
Speaking of battery life, I highly recommend getting one or even two spares. The XQ1 is snappy and responsive (especially in its “high-performance” mode), but this comes at a price. Luckily, the batteries are so small that you can easily carry a few them in your pocket.
For manual focus purposes, the XQ1 offers Instant Focus (by pressing the macro button in MF mode), a magnifier tool and focus peaking. As usual, all three of these aids can be combined if necessary.
Video
The XQ1 offers the same modernized video modes as the X-E2: The hybrid tracking CDAF/PDAF system is better suited for capturing moving images than Fuji’s previous cameras, and there are full-HD video options with either 60 fps or 30 fps available. Even better, the XQ1 offers several high-speed video modes (80 fps, 150 fps and 250 fps) at lower resolutions. Manual exposure compensation up to ± 2 EV can be applied and changed during recording. However, it’s not possible to manually select ISO, aperture or shutter speed in video mode.
Accessories
Unlike the XF1, the XQ1 is compatible with RR-90 remote shutter release accessories. There are also (as of yet still unofficial) plans to add a wifi firmware update that would allow smartphones and tablets to access the live view and remote control the camera. The XQ1’s current wifi implementation allows the transfer of JPEG images to smartphones and tablets, or of JPEGs and RAWs to your PC/Mac. It’s also possible to obtain geotagging data from a GPS-equipped smartphone. The camera will then save this location information in the EXIF data of subsequently taken shots.
There’s good news for snorkelers and scuba divers, too: In January, Fujifilm plans to release an underwater casing for the XQ1.
What’s Next?
I talked to Zeiss, and it appears like there’s still no final decision if or when Zeiss Touit X-mount lenses will receive a firmware upgrade to support the PDAF and LMO of the Fuji X-E2 (and future Fuji system cameras). As you know, all native Fujinon X-mount lenses will receive such updates in November.
I will spend much of the coming weeks writing my new eBook on making the most out of the X-E2. X-Pert Corner will continue, but not at the frantic pace of the past weeks. In the meantime, if you haven’t already done so, feel free to read my current book “Mastering the X-E1 and X-Pro1”. Click here to get DRM-free eBook versions or/and the print edition. Enter the code FUJISAVES30 to get a discount of 30% till the end of November.
Wanna see larger image samples? Click here to see my expanded set of XQ1 sample images, or click here to see my expanded X-E2 sample images set.
PRE-ORDER
X-E2 – USA: AmazonUS / BHphoto / Adorama / DigitalRev / Pictureline / EUROPE: wexphotographicUK / DigitalRev / Fotomundus24 GER / PCHstore /
XQ1 – USA: AmazonUS / BHphoto / Adorama / DigitalRev / EUROPE: wexphotographicUK / DigitalRev / PCHstore /
For your convenience, here’s a TOC with links to my previous X-PERT CORNER articles:
- PDAF & LMO Lens Firmware Updates Coming in November
- First Look: Fujifilm X-E2
- How Fuji could save the X-M1
- X-A1 vs. X-M1: Photo Ninja Edition
- X-A1 vs. X-M1: the Shootout
- Using the Fujifilm X-A1 [& X-M1]
- First Look: Fujinon XF23mmF1.4 R
- RAW Converter Shootout Results
- Ultimate RAW Converter Shootout
- First Look: X-M1 with New Kit Zoom and Pancake Lens
- Zeiss Touit vs. Fujinon XF
- Remote Shutter Control for X Series Cameras
- Apple Camera RAW, X-Trans and EXR
- First Look: XF55-200mmF3.5-4.8 R LM OIS
- Studio X
- Using the X100S
- Using the X20
- X100S vs. X100
- X20 vs. X10
- RAW, JPEG, Silkypix and “Fuji Colors”
- Adapting Third-Party Lenses (updated with Speed Booster)
- RAW for JPEG Shooters…
- Tips for Updating your Firmware
- How to Clean the X-Trans Sensor
- Using the XF14mmF2.8 R
- Decoding XF18-55mmF2.8-4 R LM OIS
- Comparing RAW converters: JPEG vs. Lightroom, Capture One, Silkypix & RPP
- XF14mmF2.8 R appears to be almost distortion free
- How to Expand Dynamic Range
- How to Use Extended ISO
- EXR, anyone?
- Capture One – When the Going Gets Tough…
- Using Shooting Profiles and the Quick Menu
Rico Pfirstinger studied communications and has been working as journalist, publicist, and photographer since the mid-80s. He has written a number of books on topics as diverse as Adobe PageMaker and sled dogs, and produced a beautiful book of photographs titled Huskies in Action (German version). He has spent time working as the head of a department with the German Burda-Publishing Company and served as chief editor for a winter sports website. After eight years as a freelance film critic and entertainment writer in Los Angeles, Rico now lives in Germany and devotes his time to digital photography and compact camera systems. His book “Mastering the FUJIFILM X-Pro1” (Kindle Edition) (Apple iBook Store) (German version) is available on Amazon and offers a plethora of tips, secrets and background information on successfully using Fuji’s X-Pro1 and X-E1 system cameras, lenses and key accessories.


