First Look: Fujifilm X-E2
First Look: Fujifilm X-E2
Talk to Rico (open forum for questions & feedback) – Rico’s Flickr sets – X-E2 Sample Images Set – X-E2 Tracking AF Samples (private set, must use this link) – X-E2 Lens Modulation Optimizer (LMO) Examples (private set, must use this link) – Mastering the Fujifilm X-Pro1 reading samples (65 free pages) – Order my NEW book (print or DRM-free eBook/PDF): Mastering the Fujifilm X-E1 and X-Pro1 (use code FUJISAVES30 to save 30%!)
Good morning and welcome to this early edition of Friday’s X-Pert Corner. Today’s column is all about the new Fujifilm X-E2, the successor of the popular X-E1 mirrorless system camera. Here it is:
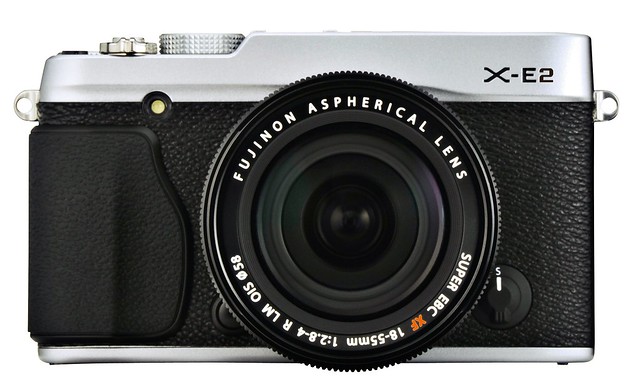
I was able to test drive an early pre-production unit of the X-E2 for the past 4-5 weeks. Don’t worry, compact camera fans: I will soon add another First Look article on the XQ1. If you aren’t yet familiar with Fuji’s X-E family of cameras, click here to access the official product information page explaining the features and listing the full specifications of the X-E2.

X-E2 SOOC JPEG (click on the image to access the full sample set)
The X-E2 is a camera many Fujifilm enthusiasts have been waiting for. Don’t let its almost unchanged exterior fool you: The X-E2 is an all-new camera on the inside, with object-tracking on-sensor PDAF, an almost twice as fast image processor with LMO (Lens Modulation Optimizer) support, 14 bit RAW processing, face detection, wifi networking (which is supposed to offer wireless remote control after a future firmware update) and dozens of small but important improvements that make shooting with this camera easier and more enjoyable, all without sacrificing its classic retro design and manual controls.
Exterior, Displays and User Interface
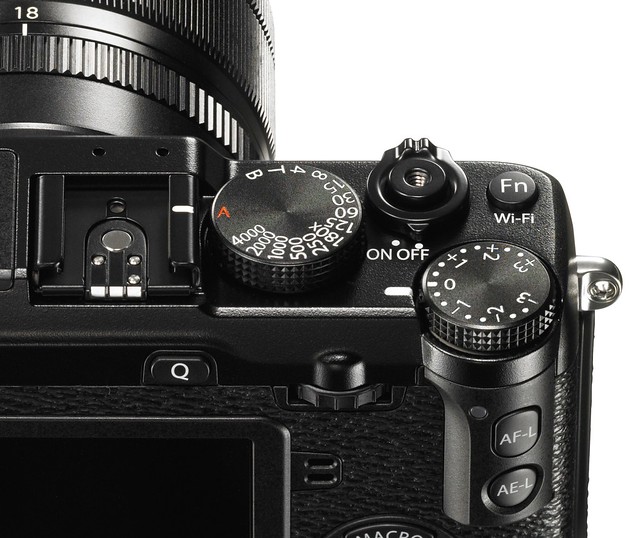
A brief glance at the X-E2’s exterior reveals several changes and improvements, such as the shutter dial with a fixed 1/180s flash sync stop, or the new 3-inch LCD display with 1,040K dots and a native 3:2 aspect ratio (X-E1: 420k 2.8″ 4:3 display). The electronic viewfinder (EVF) is the same 2,360K dot OLED display we already know from the X-E1, with a built-in -4 to +2 diopter adjustment. However, the EVF/LCD refresh rate has been significantly improved from 20 fps to 50-60 fps in low light. This makes shooting action in bad light (like concerts) so much easier. There’s virtually no more motion blurring when panning the camera.
The X-E2’s EVF/LCD screens offer a pretty accurate WYSIWYG display. They do so in all four PASM exposure modes—yes, even in manual exposure mode! This means that in manual mode (M), the live histogram is now fully functional and the camera’s live view shows a preview that very much resembles the brightness of the actual exposure. Most photographers will love this, but some studio and flash photographers won’t. That’s why there’s a menu option to switch the manual mode live view back to the traditional auto-gain display known from the X-E1.

The X-E2 features separate buttons for AE-L and AF-L, so exposure (AE) and autofocus (AF) can now be locked independently from each other. This also means that AE-L is still available in manual focus (MF) mode, where the AF-L button assumes the popular “Instant AF” function. Don’t like this new feature? No worries, you can configure the camera to behave like an X-E1 and merge AE-L and AF-L on a single button.
With AE-L engaged, you can now finally make changes to the selected aperture or shutter speed. That’s because unlike the X-E1, the X-E2 doesn’t lock exposure values, it locks the actual exposure. In a similar manner, AF-L now allows making changes to the aperture and shutter speed, too. However, it doesn’t recognize changing the exposure compensation dial. I have already contacted Fujifilm about this slight omission, so this might be addressed in a future firmware update.

X-E2 SOOC JPEG (click on the image to access the full sample set)
The improved exposure compensation dial covers a more substantial range of ± 3 EV, allowing for stronger adjustments in difficult lighting situations. While the camera’s built-in flash remains the same as in the X-E1, flash output compensation now covers a range of ± 2 EV, way better than the ± 2/3 EV of the X-E1. Sadly, exposure bracketing is still limited to three frames and a maximum exposure range of ± 1 EV. Even worse, the camera still freezes until all images of a bracketing series have been transferred to the SD card. Practically, this isn’t much of an issue, though, because the X-E2 works really fast when you use an UHS-1 SD card with a nominal write speed of at least 80 or 90 MB/s.
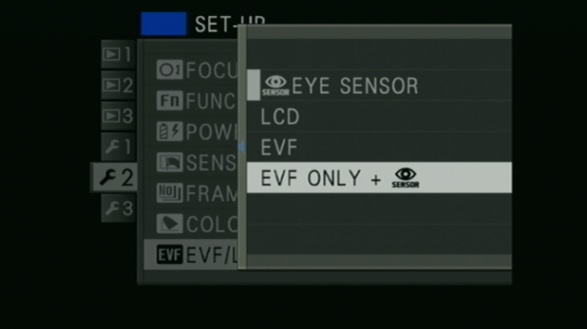
On the X-E2, the Q button to access the popular Quick Menu has now replaced the View Mode button of the X-E1. The View Mode functionality is still available, but it’s buried in the setup menu. Sadly, there’s no way to assign the View Mode function to any of the camera’s four(!) function buttons. This could easily be rectified with a firmware upgrade, though. On the bright side, the improved View Mode function now includes a new “EVF only” option that activates the EVF only when you are actually using it. This is basically an energy saving mode: When it’s on, the LCD display stays dark all the time, and the EVF is only working when someone is looking through the viewfinder.
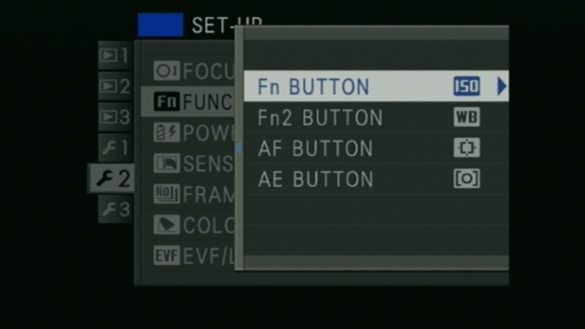
I already mentioned that the X-E2 offers four different Fn buttons. So where are they? It’s rather straightforward: In addition to the standard Fn and AF (arrow-down) buttons known from the X-E1 and X-Pro1, the X-E2 features a second Fn2 button to the left of the LCD display. Directly above this button, the AE button is serving as another Fn button and can hence assume any of 18 different functions. Sadly, neither the popular View Mode nor the new Face Detection function can be assigned to an Fn button. Especially the latter is quite unbelievable, since all other Fuji X cameras with this feature allow “Face Detection ON/OFF” to be assigned to any Fn button. Fuji should take care of this with a quick firmware update.
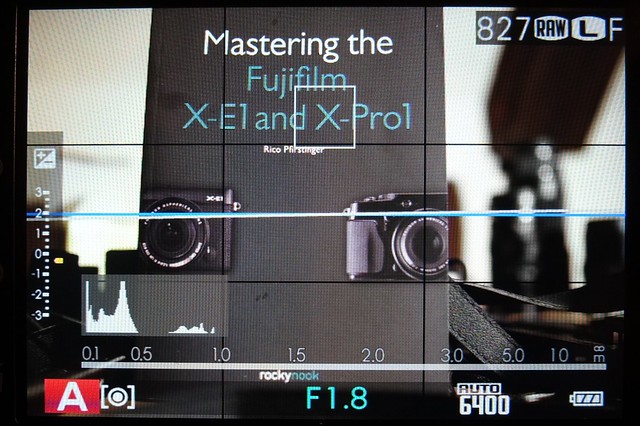
The X-E2’s EVF/LCD user interface has been improved: The distance/DOF scale is now semi-transparent and obscures less of the scene than in previous X camera models. Also, manual exposure compensation is now easier to recognize thanks to the correction indicator arrow turning yellow. Even better: With active Auto-ISO and Auto-DR, a half-press of the shutter (or pressing the AE-L button) now not only displays the actual ISO value, it also reveals the actual DR setting chosen by the automatic dynamic range function. No more surprises!
Speaking of Auto-DR, the X-E2 (and XQ1) will always choose either DR100% or DR200%, so the DR400% setting is only available when it’s manually selected. It remains to be seen if this is deliberate or just a pre-production firmware glitch. In any case, DR-Auto is now also available in manual exposure mode (M).
The illustration below shows the improved live view screen layout with the live histogram and an exposure compensation of – 1/3 EV:
Here’s the same scene upon half-pressing the shutter button:
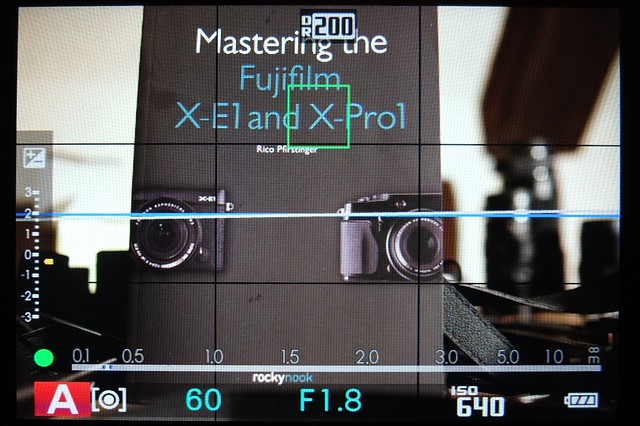
You may note that the X-E2’s AF frames are squares instead of rectangles (they are still available in five different sizes) and that there’s a new green AF confirmation dot in the lower left corner of the screen. This dot can be quite useful during AF tracking, since it indicates whether a tracked target is currently in focus or not.
Fuji has made a few minor changes to the behavior of some of the back buttons: Pressing and holding the DISP/BACK button does no longer enable/disable Silent Mode, and pressing and holding the Q button does no longer give direct access the Edit Custom Setting function. On the other hand, engaging the Key Lock function by pressing and holding the OK button now also locks the AE-L and AF-L buttons.
Speaking of user interface changes and enhancements, the Image Display (aka image review) function now offers two shorter instant review durations of either 0.5 or 1.5 seconds. Hardcore DSLR shooters will be happy to learn that when the eye sensor is active, they can now instantly review an image on the LCD screen as soon as they remove their eye from the EVF in order to look at the LCD.

X-E2: SOOC JPEG (click on the image to access the full sample set)
The popular manual focus (MF) magnifier tool is now also available in autofocus (AF-S) mode by simply pressing the command dial, offering a magnification level that’s somewhere in between of the two magnification levels that are available in MF mode. Even better, the MF/AF magnifier tool now remains available while the cameras is writing data to the SD card. In AF-S, you can take an exposure while the magnifier is engaged, so you can more easily catch the very instant when your subject is in perfect focus.
Manual focus users can combine the magnifier with one of two additional focusing aids: traditional focus peaking or the PDAF based Digital Split Image mode already known from the X100S.
In playback mode, magnified images that were shot in portrait format now occupy the entire screen, and images can now be deleted when viewing them zoomed in. Yay!
New and Improved Features
The X-E2 incorporates a Lens Modulation Optimizer (LMO). This feature is already known from the X100S and X20, and you can learn more about it by clicking here. Adding the LMO to the X-E2 means that in order to support this feature, all lenses require a firmware update, adding specific LMO data that the camera’s processor (or possibly an external RAW converter) can use to reduce diffraction and other unwanted optical effects by applying state-of-the-art deconvolution algorithms. As of now, only the new XF23mmF1.4 R lens supports the LMO right out of the box, that’s why many of my sample images were taken with this lens. I will add more samples in the days and weeks to come, so check back frequently.
In order to assess the effect of the LMO, I have taken a few test images at different apertures. Click here to access a private Flickr set where you can directly compare several 100% crops of images taken at different apertures with active or inactive LMO. As it turns out, the LMO is not only effective at small apertures with plenty of diffraction, is also improves things at wider apertures, including the optical “sweet spot” of a lens.

X-E2: SOOC JPEG (click on the image to access the full sample set)
The LMO can be turned on and off in the shooting menu and in the camera’s internal RAW converter, giving you the opportunity to create different versions of an image based on the same RAW file. Don’t like the results of the LMO? Simply switch it off!
According to my sources at Fujifilm, all XF lenses will receive LMO firmware updates within a few months, many of them already before the holidays. There are no such plans for the cheaper XC lenses, though, and while the processor hardware of the X-M1 and X-A1 could support an LMO firmware update, Fujifilm has currently no plans to offer one. Users of the X-Pro1 and X-E1 are definitely out of luck, because the older processor hardware in these cameras isn’t able to support the LMO.
As of now, it’s still unclear to me whether the X-E2 saves the LMO data in the RAW metadata of a shot. I suppose it does, which would open the door for external RAW converters to support this feature, too. Brian Griffith of Iridient and Jim Christian of PictureCode (Photo Ninja) might want to look into this. By the way, Iridient Developer and Photo Ninja are already offering X-E2 and XQ1 support. You can view samples that were processed with both of these converters in my Flickr set.

X-E2: RAW with Photo Ninja (click on the image to access the full sample set)
Let’s talk about Auto-Iso. As expected, the X-E2 offers the same Auto-ISO functionality as in the X100S, X20, X-A1 and X-M1: You can set an ISO floor, an ISO ceiling and a minimum shutter speed. So far, so good, but it gets even better, because in the X-E2, the minimum shutter speed can now exceed 1/125s. It can be set as fast as 1/500s. Action shooters will love this.
On the downside, the maximum shutter speed of the X-E2 is still 1/4000s, so those who want to shoot in bright light with a wide open XF56mmF1.2 R lens should probably invest in an ND filter. The maximum flash-sync speed remains at 1/180s, too, but at least there’s now an extra position for it on the shutter speed dial.
Speaking of minimum shutter speeds, there have been changes in the minimum flash-sync speeds the camera is using with its built-in or an external TTL flash unit: With native lenses, the camera’s minimum shutter speed in forced flash mode is now 1/[2 x focal length] seconds. With adapted lenses, the minimum shutter speed has been doubled from 1/15s to a more practical 1/30s. Sadly, the camera is still not using the focal length information in the lens adapter menu in order to adjust the minimum flash-sync speed in a more flexible and smarter way. In slow-sync flash mode, there’s now a new minimum shutter speed of 1/8s for adapted and native lenses. This is different from the X-E1, which has no minimum shutter speed at all in slow-sync flash mode.
Here’s another shutter speed enhancement: In S and M modes, “odd” in-between shutter speed settings like 1/640s are now remembered when the camera is switched off and on again or toggled between playback and shooting mode.
Sadly, the X-E2’s double exposure function no longer saves a RAW file of the composite image, so those of you who actually use this feature will only get a JPEG. The same is true when using one of the 13 effect filters, so-called Advanced Filters. These filters are well known from many other X series cameras, but all you’ll get out of them is a JPEG file. In the same fashion, Advanced Filters still can’t be applied to RAW files in the camera’s built-in RAW converter.

X-E2: RAW with Iridient Developer (click on the image to access the full sample set)
Like the X-M1 and X-A1, the X-E2 is equipped with wifi and can communicate with PCs (Mac/Windows) and smartphones/tablets running Android or iOS. The user interface has been simplified to incorporate “one touch” operation: Simply press the Fn (Wi-Fi) button in playback mode and handle the rest with a Fujifilm app running on your tablet or smartphone. As of now, wifi basically offers manual image transfer to computers or smartphones. It’s also possible to obtain GPS location information (geotagging data) from your smartphone, which is then stored in the EXIF data of subsequently taken shots. A future firmware update is supposed to offer a wifi remote control feature and will most likely also be made available for the X-M1 and X-A1. However, please take this with a grain of salt, since such an update hasn’t officially been announced, yet.
Autofocus and Performance
For many users, the most important enhancement of the X-E2 is its hybrid on-sensor PDAF/CDAF autofocus system. In principle, this isn’t really new, as the X100S and X20 already offer such a system. That said, the X-E2 (and also XQ1) advance this feature to a whole new level by (finally!) implementing tracking autofocus for objects that move towards and away from the camera.
This new AF-C mode continuously tries to keep a moving object in focus while the shutter is half-pressed. In order to facilitate this, AF-C now offers the same selection of 49 AF frames (each in five different sizes) as the more conventional AF-S mode. The nine AF frames in the center serve as combined PDAF/CDAF frames, offering the best AF performance by combining the fast on-sensor phase detection autofocus (PDAF) with the very accurate contrast detection autofocus (CDAF).
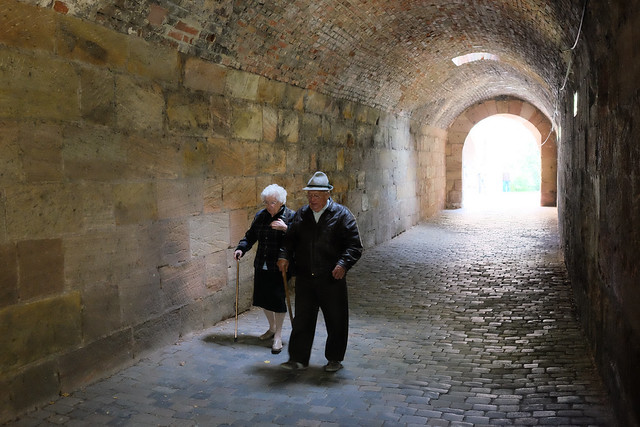
X-E2: SOOC JPEG ISO 6400 (click on the image to access the full sample set)
Both AF-S and AF-C also work with face detection, meaning the camera can follow a person that is walking towards the camera. So what happened to the “old AF-C” of the X-E1 and X-Pro1? This feature is actually still available as an option in the camera menu, and you can now use it as an addition to the updated AF-S and AF-C modes. The option is called Pre-AF: When activated, it will continuously try to focus on any object the camera is pointed at, just like the old AF-C did in the X-E1. Obviously, this feature quickly drains the battery. Since the “real” AF-C is kicking in as soon as the shutter button is half-pressed, pre-AF should rarely be required.
How is the new AF-C performing? You can use it in single-shot mode or in combination with the X-E2’s low-speed burst more of 3 frames per second (fps). In burst mode, the camera will still measure and readjust focus and exposure of each shot that’s taken while the shutter button remains depressed, but it won’t make changes to white balance or dynamic range (DR) settings. The latter are always established in the first frame of a burst and they remain the same throughout the series.
Using the high-speed burst mode of 7 fps, AF tracking is no longer available. Focus, exposure, white balance and DR settings are established in the first frame of a burst and remain unchanged throughout the series. The X-E2’s image buffer holds approximately 28 JPEGs or 8 RAW+FINE files. You can take an unlimited number of shots at 3 fps when you are using a really fast SD card.
Let’s have a look at AF-C in combination with the low-speed 3 fps burst mode: With these settings, you have a choice of either using face detection or any of the 49 AF frames to track a moving subject. Using an AF frame is more precise, especially if you select one of the 9 central hybrid AF frames. Both PDAF and CDAF respond to the size of the selected AF frame: A larger AF frame increases the chance of the PDAF to engage, while a smaller AF frame increases the autofocus accuracy. It’s up to the user to set a compromise that gets the job done.
This private Flickr set shows a sequence of six images that were taken with AF-C in 3 fps burst mode while the girl was walking towards the camera. The set also shows 100% crops of all six images, and as it turns out, each one of them is in quite perfect focus. Now, this isn’t always the case, of course. There’s also a difference between a walking person and a speeding horse, car or child. Further tests will be required with production cameras and lenses.
In order to use the X-E2’s PDAF, all native XF and XC lenses need firmware updates. As of now, only the XF23mmF1.4 R lens supports PDAF out of the box, so I couldn’t shoot tracking AF samples using a more adequate telephoto lens such as the XF55-200mm zoom. I will perform more tests as soon as Fuji offers firmware upgrades for those lenses. This is supposed to happen in the next few months, with most lenses receiving updates already before the holidays. All XF and XC lenses will eventually support PDAF, at least those from Fujifilm. I haven’t received any information about LMO and PDAF updates for Zeiss Touit lenses.
The overall AF performance of the X-E2 appears to be quite good, if not excellent. The camera feels snappy, and PDAF leads to virtually instantaneous focusing. By the way: Similar to the X-M1 and X-A1, images shot in a burst mode are now saved as “standard” images with conventional “DSCF” filenames. No more filenames starting with an “S”!
Video
The X-E2 records full-HD video at either 60 or 30 frames per second (X-E1: 24 fps). Autofocus and the Optical Image Stabilizer (OIS) in the XF/XC zoom lenses have been optimized for video usage. Face detection also works in video mode, and it is possible to manually focus and apply up to ± 2 EV of exposure compensation while the camera is recording. That said, some users may be unhappy with the reduced maximum recording length of now 14.5 minutes per take. The X-E1 records takes that can be about twice as long.

X-E2: JPEG & Aperture (click on the image to access the full sample set)
Since the X-E2 occupies the same body design as the X-E1, existing X-E1 accessories remain compatible. There’s one exception, though: Like the XQ1, X-M1 and X-A1, the X-E2 is using a standardized Micro USB port. This means that older RR-80 remote control units aren’t compatible with the X-E2. Instead, you’ll have to get a remote that’s compatible with the new RR-90 standard. Hopefully, there’ll soon be third-party adapters that allow using RR-80 remotes on RR-90 cameras. Of course, there’s still the other option of using the X-E2’s microphone port as a remote trigger. You can read more about this topic in my Remote Shutter Control for X Series Cameras column.
PRE-ORDERS
by purchasing your camera using the link below, you’ll support Fujirumors. You won’t pay a single penny more for your camera, but a small commision goes to FR. It’s big help for the site and keeps it ticking over.
X-E2 – USA: AmazonUS / BHphoto / Adorama / DigitalRev / Pictureline / EUROPE: wexphotographicUK / DigitalRev / Fotomundus24 GER / PCHstore /
XQ1 – USA: AmazonUS / BHphoto / Adorama / DigitalRev / EUROPE: wexphotographicUK / DigitalRev / PCHstore /
What’s Next?
I am already working on a new eBook showcasing more than 100 tips and tricks for mastering the X-E2. It should be available near the end of 2013 or in early 2014.
By the way: Don’t underestimate the XQ1! This little camera is even smaller and 20% lighter than the tiny XF1. It fits in every pocket, but its performance can match the X-E2 in many aspects: The full-metal XQ1 features the same hybrid tracking AF and the same fast EXR II processor. It shoots bursts with up to 12 fps, it features a built-in LMO, and it records full-HD video at 60 fps and high-speed video up to 250 fps. The new control ring of the XQ1 is quite ingenious, and Fujifilm is going to offer a custom underwater casing for this camera. It’s an X20 on steroids! Stay tuned for my First Look article on the XQ1 right here on X-Pert Corner.

XQ1: SOOC JPEG
For your convenience, here’s a TOC with links to my previous X-PERT CORNER articles:
- How Fuji could save the X-M1
- X-A1 vs. X-M1: Photo Ninja Edition
- X-A1 vs. X-M1: the Shootout
- Using the Fujifilm X-A1 [& X-M1]
- First Look: Fujinon XF23mmF1.4 R
- RAW Converter Shootout Results
- Ultimate RAW Converter Shootout
- First Look: X-M1 with New Kit Zoom and Pancake Lens
- Zeiss Touit vs. Fujinon XF
- Remote Shutter Control for X Series Cameras
- Apple Camera RAW, X-Trans and EXR
- First Look: XF55-200mmF3.5-4.8 R LM OIS
- Studio X
- Using the X100S
- Using the X20
- X100S vs. X100
- X20 vs. X10
- RAW, JPEG, Silkypix and “Fuji Colors”
- Adapting Third-Party Lenses (updated with Speed Booster)
- RAW for JPEG Shooters…
- Tips for Updating your Firmware
- How to Clean the X-Trans Sensor
- Using the XF14mmF2.8 R
- Decoding XF18-55mmF2.8-4 R LM OIS
- Comparing RAW converters: JPEG vs. Lightroom, Capture One, Silkypix & RPP
- XF14mmF2.8 R appears to be almost distortion free
- How to Expand Dynamic Range
- How to Use Extended ISO
- EXR, anyone?
- Capture One – When the Going Gets Tough…
- Using Shooting Profiles and the Quick Menu
Rico Pfirstinger studied communications and has been working as journalist, publicist, and photographer since the mid-80s. He has written a number of books on topics as diverse as Adobe PageMaker and sled dogs, and produced a beautiful book of photographs titled Huskies in Action (German version). He has spent time working as the head of a department with the German Burda-Publishing Company and served as chief editor for a winter sports website. After eight years as a freelance film critic and entertainment writer in Los Angeles, Rico now lives in Germany and devotes his time to digital photography and compact camera systems. His book “Mastering the FUJIFILM X-Pro1” (Kindle Edition) (Apple iBook Store) (German version) is available on Amazon and offers a plethora of tips, secrets and background information on successfully using Fuji’s X-Pro1 and X-E1 system cameras, lenses and key accessories.


