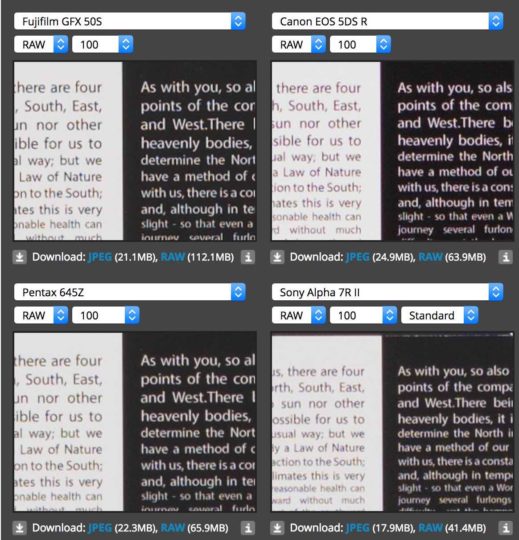
DPreview just added their studio samples. Check them out here: “In terms of high ISO noise, the GFX 50S performs fairly similarly to the Pentax 645Z and, as sensor size alone would lead you to expect: better than the Canon EOS 5D SR. However, because Sony’s a7R II sensor uses a more modern BSI design, it’s able to be more efficient, which means it’s able to close the gap to the bigger sensor cameras. “
So DPreview does not sound so enthusiastic like imaging-resource, who, in their own lab tests, where blown away by the GFX, and said it’s the camera with the best lab results they have ever tested. See the imaging-resource results here.
The French site focus-numerique published their detailed review with lab tests here (translation): “For his superlative picture quality, it’s hard not to recommend the GFX“
GFX 50S VS Canon EOS 5DsR Review at the daniel life Youtube (with RAW files to compare by yourself). Tested on the street and studio. And the reviewer admits he was never a Fujifilm fan, but the GFX evidently changed this :-)
Shared by Chris Weiner here (visible only to GFX facebook group members… but it’s the image I shared at the top): “Having used a PhaseOne and an H5D for more than two years, I can say that a sharp handheld headshot at 1/15 is unheard of in the world of medium format! Bravo to Fuji engineers.”
DPreview GFX shooting Experience
DPreview just shared their Fujifilm GFX shooting experience in Tokyo. Some excerpts:
I love the ergonomics of this camera […] most control points can be accessed using the camera with a single hand. […] the grip on the Fujifilm is just so much more comfortable [than on the Nikon D810 and Canon 5DSr]
I thoroughly enjoyed myself while shooting with with the GFX
While AF is slow, it is both accurate and precise (in good light). This is the positive of a mirrorless camera using a CDAF system.
AF is poor in low light
The viewfinder image gets noticeably ‘crunchy’ when focus is initiated, and moiré and ‘shimmering’ can be very distracting in some scenes, especially cityscapes.
Pleased with the camera’s battery life
Raw files seem to have excellent dynamic range […] I was also able to recover a ton of blown highlights
Using this camera reminded me just how much I love Fujifilm colors and skintones
Despite some sluggishness in its operation, the GFX 50S was surprisingly good for street and travel photography
The Fujifilm GFX 50S is fun and easy to use and the files look awesome. What more can I say?
Read the whole shooting experience and see the samples at dpreview
Before we start with the GFX Vs. X1D comparison, I’d like to tell you that first reports by X-guru Rico Pfirstinger say that the Adobe support for Fujifilm GFX is still not optimal (Auto-DR bug, miscalibration of most higher ISO settings and extended ISO settings issues – read it all here.).
If Rico’s observations are correct, then it might be good practice to use several RAW converters (like Iridient), to compare the RAW potential of different cameras, until Adobe improved support.
In the past, Adobe was not the fastest when it came to deliver proper support for Fujifilm cameras. With X-Trans, the situation was so desperate, that Fuji Guy Billy even made a public appeal to Adobe to finally work seriously on X-Trans support.
Luckily the things are much better today and the issues of the past have been fixed. Especially the combination Lightroom 6 and X-TransIII give the best results we have ever seen from Adobe. But it was a really long journey.
Fujifilm GFX Vs. Hasselblad X1D Shadow Recovery
RAW files, Art Work, Tech Talk, Inspiration, Suggestions, Help… it’s all there, at our Fujifilm GFX community :) And if all you want are news and rumors tailored to GFX only, check out our public GFX Facebook page.
GFX facebook member Alex compared the Shadow recovering capability of the Fujifilm GFX Vs. the one of the Hasselblad X1D in this facebook post (visible only for GFX members, but you can find the images also below in this article). Both feature a 50MP 44×33 Medium Format sensor. Here are his clonclusions:
“Standard testing 3 stops under 5 stop push (and then some with shadows). Fuji looking great no real colour noise in the shadows here as the X1D – well see for yourself”
Original Frame
Fujifilm GFX (look at the shadow under the car)
Hasselblad X1D (look at the shadow under the car)
_ _ _
Piet Van den Eynde: + 3 on the Exposure slider and no grain to be seen – shared here
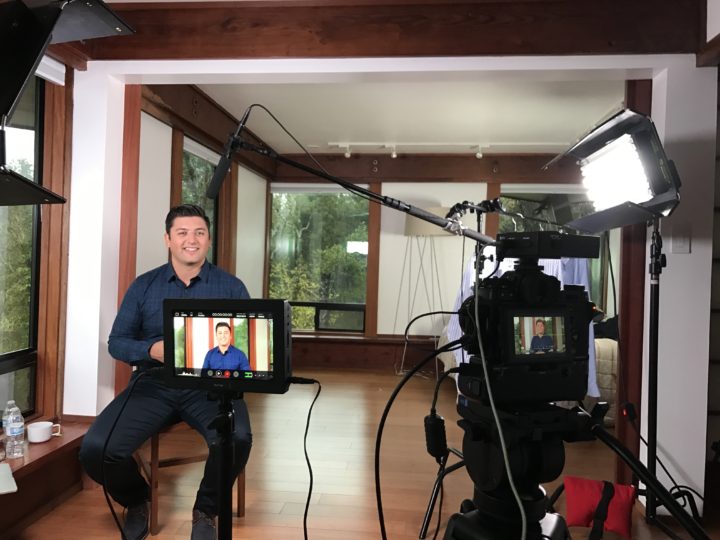
I recently purchased the Fuji X-T2 and have been using it to shoot video. The reason for this article is to share some of the things that I find the X-T2 does well in terms of 4K video capture, and provide a few areas in which Fuji could improve the experience for video capture with firmware updates. Also I will share a very valuable lesson that I discovered that cost me a day of filming!
My setup
Along with the X-T2, I bought Fuji’s Vertical Power Booster Grip, which is a must for filming in 4K. Not only does having this allow you to film up to 30 minutes at a time (without it you’re limited to 10 minute clips), I find that having the included power adapter that came with the grip extremely helpful when filming interviews and the camera is locked down on a tripod. I never have to worry about charging batteries! (Note, even though you may be plugged into power, the internal battery in the camera itself will slowly drain over time, so keep that in mind).
For lenses I’ve mainly been using the Fuji XF 16-55 F2.8 R LM WR. I find that the zoom range is useful when recomposing the shot to adjust for head room, and the F2.8 max aperture allows for some decent separation from the background. When a bit more shallow depth of field is desired, I use the Fuji XF 35mm F2 WR. It has some beautiful bokeh and is very sharp!
For monitoring video, and to aid in making sure the shot is in focus, I recently acquired the Black Magic Video Assist 4K 7” monitor which is also serves as an external recorder. Using it allows you to film longer than 30 minutes (if you need to) and the ability to save out in F-Log for color grading. I’ve only used this monitor a couple times, but there’s very important something to understand about using it with the Fuji. More on that later.
What I find works well
4K video quality – The video that comes out of this is simply amazing in terms of sharpness. Its most likely due to the fact that it actually shoots 6K video internally and down samples to 4K for output. The 1.17 crop factor is not a big deal for me, but its something to be mindful when switching back and forth from shooting HD.
Focus Peaking – I’ve found that when focusing manually, changing the color to red works the best.
Continuous AF – When filming a subject that is moving and its challenging to focus manually, I find that the using the continuous AF with face stabilization enabled does a pretty good job.
Analog Controls – Before using the X-T2, I was using Canon DSLR’s for my video work. One of the best features on the X-T2 that I prefer over Canon is the fact that I can easily see what my aperture, ISO, and shutter speed settings are on the dials. I know you can see those settings on the top LCD of most Canon DSLR’s, but I find Fuji’s implementation better.
What I think could be improved
Histogram – There is no way to view the histogram when shooting video, its only an option when shooting stills.
Support for F-Log Internally – For those who can’t afford or don’t want to shoot to an external recorder, it would the great to have the option to get Flog internally.
Change ISO while recording – Currently the only way to adjust exposure while filming is to change the shutter (not recommended) or aperture (can affect DOF). Changing the ISO could do this, you can turn the dial but it won’t change while recording.
Shooting with an External Recorder
Before getting the Black Magic Video Assist 4K in order to get a flat looking image that could be color corrected, I tried shooting with Pro Neg. Std profile, and made the following tweaks:
Highlight tone -2
Shadow tone -2
Color – 4
Sharpness down to -4
Now with the Black Magic monitor I have the ability to shoot F-Log externally. However there are a few things to consider. If you are recording 4K video you have three options as to where to save the video, on the SD card, externally via HDMI, and externally via HDMI with Flog. (Note when using Flog, the camera suggests that your minimum ISO be 800, not sure why).
If you choose to record to the internal SD card in 4K, you can also send out an HD stream via HDMI that can be recorded, however if you choose to record in 4K externally you can only record externally and not internally at the same time. I made the assumption you could. Also keep in mind that recording externally can generate huge files depending on what kind of codec you choose in the external recorder.
The last point that I want to make is be careful when using SD cards in the Black Magic Video Assist 4K and in your Fuji cameras. I found out the hard way that the formatting used is not compatible between the two.
I had the bright idea of swapping cards between the camera and the monitor and formatted an SD card in the Black Magic, which uses HFS+ or exFAT. I chose exFAT. When I decided not to record to the Black Magic and stuck the card in the X-T2, which uses Fat32, I ended up with a card that looked like it didn’t record anything! Fortunately using Lexar recovery software I was able to rescue 80% of the footage and we didn’t have to reshoot too much.
The lesson I learned is always format the card in the device you’re going to be using it in, and don’t assume that all devices use the same format!