X-E2 vs. X-E2S: Ending the Confusion
X-E2 vs. X-E2S: Ending the Confusion
Talk to Rico (open forum for questions & feedback)
Rico’s Books at Rocky Nook – Fuji X Secrets Workshops – Rico’s Flickr Sets
—
By upgrading your Fujifilm X-E2 with firmware 4, you are giving up the camera that you knew: Your X-E2 will turn into an X-T10—only with a rangefinder design. However, on the inside, both the X-E2v4 and the new X-E2S offer (almost) the same features, the same menu options and the same graphical user interface as the X-T10.
 This is important. To begin with, it means that your old X-E2 user manual has become pretty much obsolete. That’s why Fujifilm has created an entirely new manual along with firmware 4. You can download it here as a PDF file. It also means that my eBook on the X-E2 doesn’t apply to cameras running firmware 4 or the new X-E2S. It’s still great if you don’t upgrade your X-E2, but users who have made the jump are now much better off with my book on the X-T10.
I am not kidding! As long as you can see beyond the different form factors (rangefinder style vs. SLR style), my X-T10 book is now almost perfectly applicable. It really is, because Fuji did a terrific job transforming the X-E2 into an X-T10 with camouflage. This means that my X-E2 eBook won’t be updated. It doesn’t have to, because the update is already here.
Same Same, But Different
Okay, so your X-E2 is now a rangefinder-style version of the X-T10. Great! But what exactly are the differences between an X-E2 running firmware 4 and the new X-E2S? There seems to be some confusion, so let’s straighten it out.
X-E2 vs. X-E2S
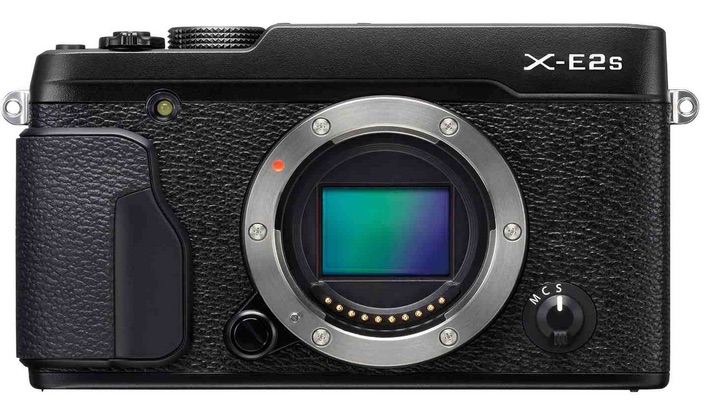
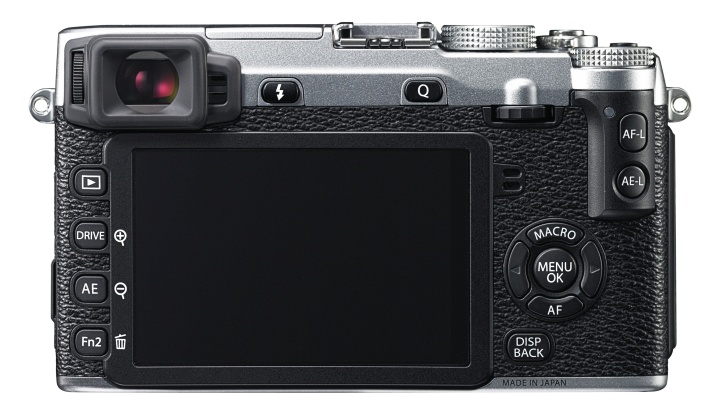
On the outside, the differences are minimal. The X-E2S offers an “improved” hand grip, but to be honest, I can’t feel much of a difference. However, pressing the four selector buttons on the back of the X-E2S does feel better, so this may be another small improvement over the classic X-E2. With firmware 4, you can forget the MACRO and AF descriptions on two of the X-E2’s selector buttons, as all four selector keys now serve as Fn buttons, just like in the X-E2S. This gives both cameras a total of 7 Fn buttons!
The most obvious difference is the Fn2 button of the X-E2, which is named AUTO on the X-E2S. Don’t worry, though. The “new” AUTO button is still a regular Fn button that can perform any function you assign it to. It’s just that its factory default assignment is to switch the X-E2S between its regular and the new AUTO mode. On the X-T10, this function is performed by a dedicated Auto lever on the camera’s top plate.
The classic X-E2 with firmware 4 doesn’t offer AUTO mode, as it requires additional hardware that (obviously) can’t be added via firmware. So what’s this new AUTO mode about? Quite simple: It turns the X-E2S into a fully automatic camera with scene recognition (SR+) and various scene modes for applications such as portrait, landscape, fireworks, sports or night photography. It’s meant for users who don’t know the camera (like a stranger that’s supposed to take a picture of you using your camera), or users who don’t want to know their camera, because they can’t be bothered with learning about aperture, shutter speed and ISO settings. If you want to know more about SR+ and the new scene position modes, please read tips 26 and 27 in my X-T10 book.
Since AUTO mode adds bits of new hardware, the X-E2S also gains another feature: motion detection. This function adds two options to the OIS menu (SHOOTING MENU > IS MODE). What is it about? As you know, the OIS (Optical Image Stabilizer) is part of several Fujinon XF and XC lenses. It reduces camera shake and allows you to shoot handheld with slower shutter speeds than usual. However, slow shutter speeds are only useful when your subject isn’t moving, because moving subjects in concert with slow shutter speeds can lead to unwanted motion blur. This is where motion detection comes into play: With the X-E2S, you can still set Auto-ISO to slow shutter speeds to make full use of your camera’s OIS system. However, when the camera detects subject movement as you press the shutter button, it will temporarily increase the minimum shutter speed by one or two stops (and increase the ISO setting along the way). Of course, if you don’t want motion detection, you can simply turn it off in the X-E2S and use one of the two regular OIS modes. You can read more about the OIS, its quirks and the new motion detection feature in tips 15 and 16 of my X-T10 book.
Anything else? Yes! The X-E2S offers a maximum extended ISO setting of 51200, while the X-E2v4 still maxes out at ISO 25600. That’s because once again, ISO 51200 is based on different hardware, so changing the firmware couldn’t do the job. However, since extended ISO settings don’t write RAW files, I don’t recommend using them, anyway. Better shoot (and underexpose the scene) at ISO 6400 and push the RAW file later with either the camera’s built-in or an external RAW converter. You can read tips 50, 51 and 52 of my X-T10 book for information on ISO amplification and extended ISO settings.
Conclusion
There really aren’t many differences between the X-E2v4 and the new X-E2S. If you already own an X-E2, don’t sell it to get a X-E2S! Just apply the upgrade and be happy with your new camera. Don’t look any further.
You can use this link to find and download the latest firmware versions for your X-series cameras and lenses. There, you will also find current versions of Fuji’s application software, such as RAW File Converter EX. A step-by-step video guide illustrating the firmware upgrade process is available here. Mac OS users can find detailed firmware download instructions here, and Windows users can click here.
For your convenience, here’s a TOC with links to my previous X-PERT CORNER articles:
- First Look: Fujifilm X70
- First Look: Fujifilm X-Pro2
- First Look: Fujifilm XF1.4x TC WR Teleconverter Lens
- First Look: Fujifilm XF35mmF2 R WR
- First Look: Fujifilm XF90mmF2 R LM WR
- First Look: Fujifilm X-T10
- Using Firmware 4
- First Look: XF16mmF1.4 R WR
- Film Simulations in RAW File Converter EX Version 2
- X-T1: Tethering with Adobe Lightroom and Fujifilm HS-V5
- First Look: Fujinon XF16-55mmF2.8 R LM WR
- XF 56mm APD vs. XF 56mm
- New Firmware Features (3): X-T1 Firmware Version 3.00
- New Firmware Features (2): Using Camera Remote
- New Firmware Features (1): Using AF+MF
- First Look: Fujinon XF 50-140mm F2.8 R LM OIS WR
- Using the Fujifilm X100T
- First Look: Fujifilm X30
- First Look: XF18-135mmF3.5-5.6 R LM OIS WR
- X-E2: Behind Firmware 2.00
- First Look: Fujifilm TCL-X100 Teleconverter for X100(S) Cameras
- First Look: Fujinon XF10-24mmF4 R OIS
- First Look: Fujifilm X-T1
- First Look: Fujinon XF56mmF1.2 R
- Exposing Right
- Using Auto-ISO
- Using Face Detection
- First Look: Fujifilm XQ1
- PDAF & LMO Lens Firmware Updates Coming in November
- First Look: Fujifilm X-E2
- How Fuji could save the X-M1
- X-A1 vs. X-M1: Photo Ninja Edition
- X-A1 vs. X-M1: the Shootout
- Using the Fujifilm X-A1 [& X-M1]
- First Look: Fujinon XF23mmF1.4 R
- RAW Converter Shootout Results
- Ultimate RAW Converter Shootout
- First Look: X-M1 with New Kit Zoom and Pancake Lens
- Zeiss Touit vs. Fujinon XF
- Remote Shutter Control for X Series Cameras
- Apple Camera RAW, X-Trans and EXR
- First Look: XF55-200mmF3.5-4.8 R LM OIS
- Studio X
- Using the X100S
- Using the X20
- X100S vs. X100
- X20 vs. X10
- RAW, JPEG, Silkypix and “Fuji Colors”
- Adapting Third-Party Lenses (updated with Speed Booster)
- RAW for JPEG Shooters…
- Tips for Updating your Firmware
- How to Clean the X-Trans Sensor
- Using the XF14mmF2.8 R
- Decoding XF18-55mmF2.8-4 R LM OIS
- Comparing RAW converters: JPEG vs. Lightroom, Capture One, Silkypix & RPP
- XF14mmF2.8 R appears to be almost distortion free
- How to Expand Dynamic Range
- How to Use Extended ISO
- EXR, anyone?
- Capture One – When the Going Gets Tough…
- Using Shooting Profiles and the Quick Menu
Rico Pfirstinger studied communications and has been working as journalist, publicist, and photographer since the mid-80s. He has written a number of books on topics as diverse as Adobe PageMaker and sled dogs, and produced a beautiful book of photographs titled Huskies in Action (German version). He has spent time working as the head of a department with the German Burda-Publishing Company and served as chief editor for a winter sports website. After eight years as a freelance film critic and entertainment writer in Los Angeles, Rico now lives in Germany and devotes his time to digital photography and compact camera systems. His new ebook The Fujifilm X-T1: 111 X-Pert Tips is available at Rocky Nook.


